What is IPsec VPN?
IPsec ( Internet Protocol Security ) protocol, It is a suite of protocols that secure IP communication by authenticating and encrypting IP packets. With IPsec VPN, organizations can create a communication infrastructure by linking branches in remote locations and as if they work in the same network.
This article will help you how to configuration IPsec VPN (site-to-site) on the pfSense 2.3 and will tell details. After the IPsec configured, different two company will access to each other’s network.
For IPsec configuration we need two pfSense firewall. We will be looking how to configuration IPsec vpn on the own two different company’s firewall.
” Example, Here is a network schema of configured IPsec VPN.”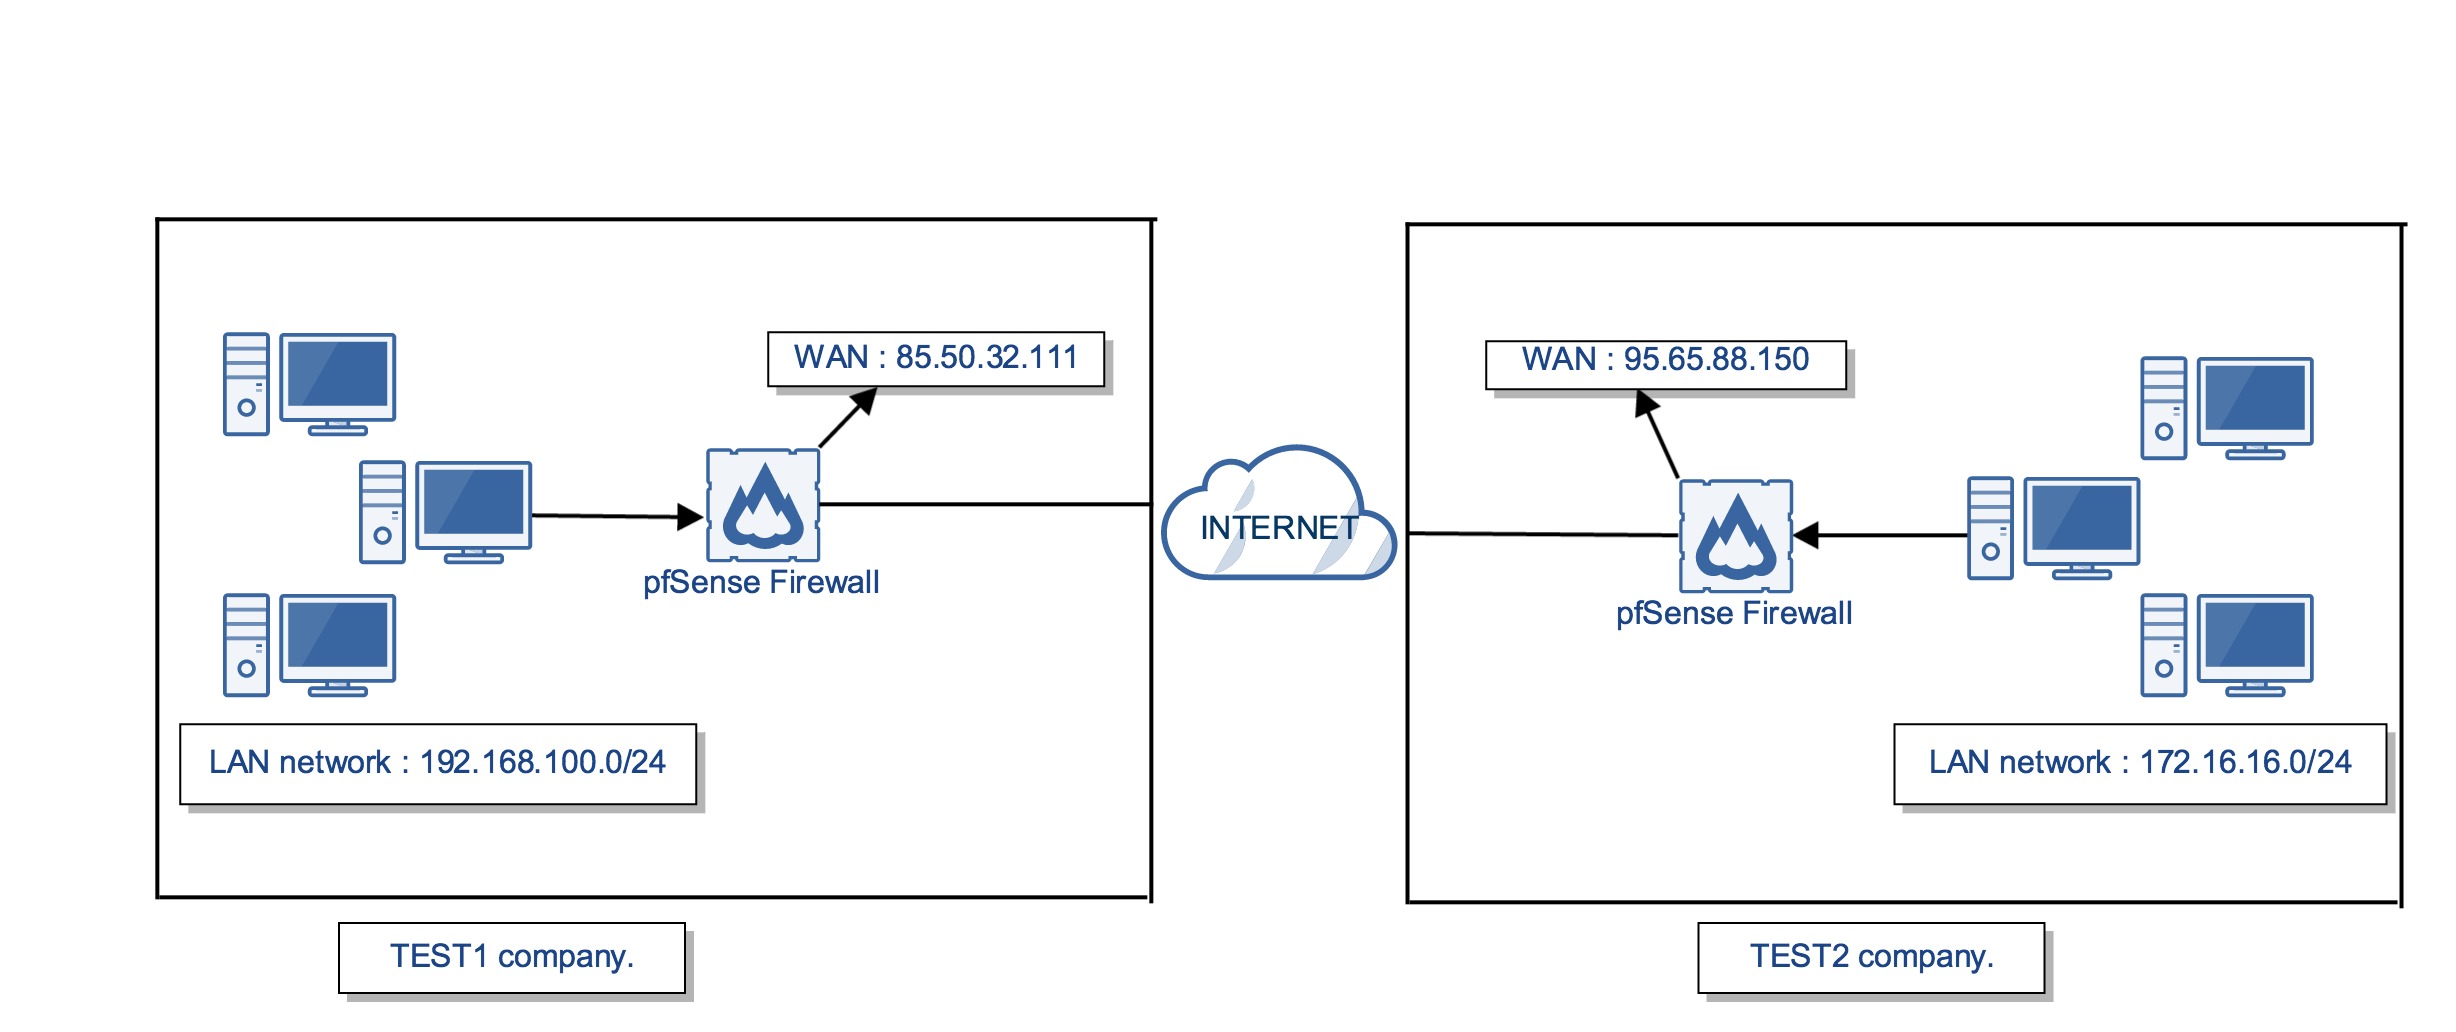
I will tell how to IPsec VPN configuration on two company which one name is TEST1 the other name is TEST2.
Important : The two different company has to static ip address, because if other company’s internet ip address changed by internet provider, IPsec vpn won’t work. That’s why we should have static internet ip address, not dynamic.
IPsec Configuration TEST1
If you want to know what is your internet ip address, check it over with this web site.
- TEST1 company has one static internet ip address : 85.50.32.111
- TEST2 company has one static internet ip address : 95.65.88.150
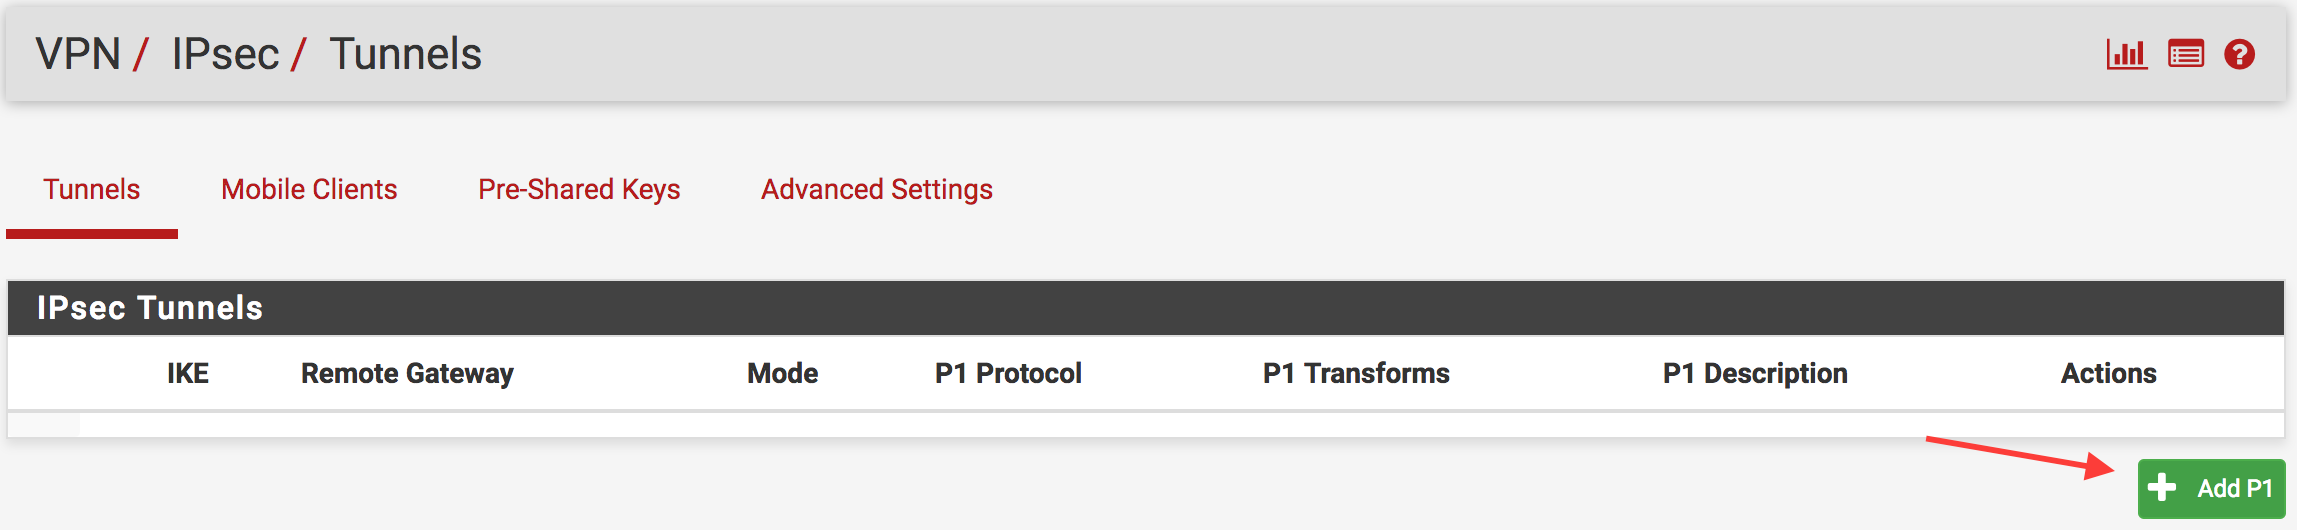
In the main menu enter the VPN > IPsec tab. After that follow the arrows.
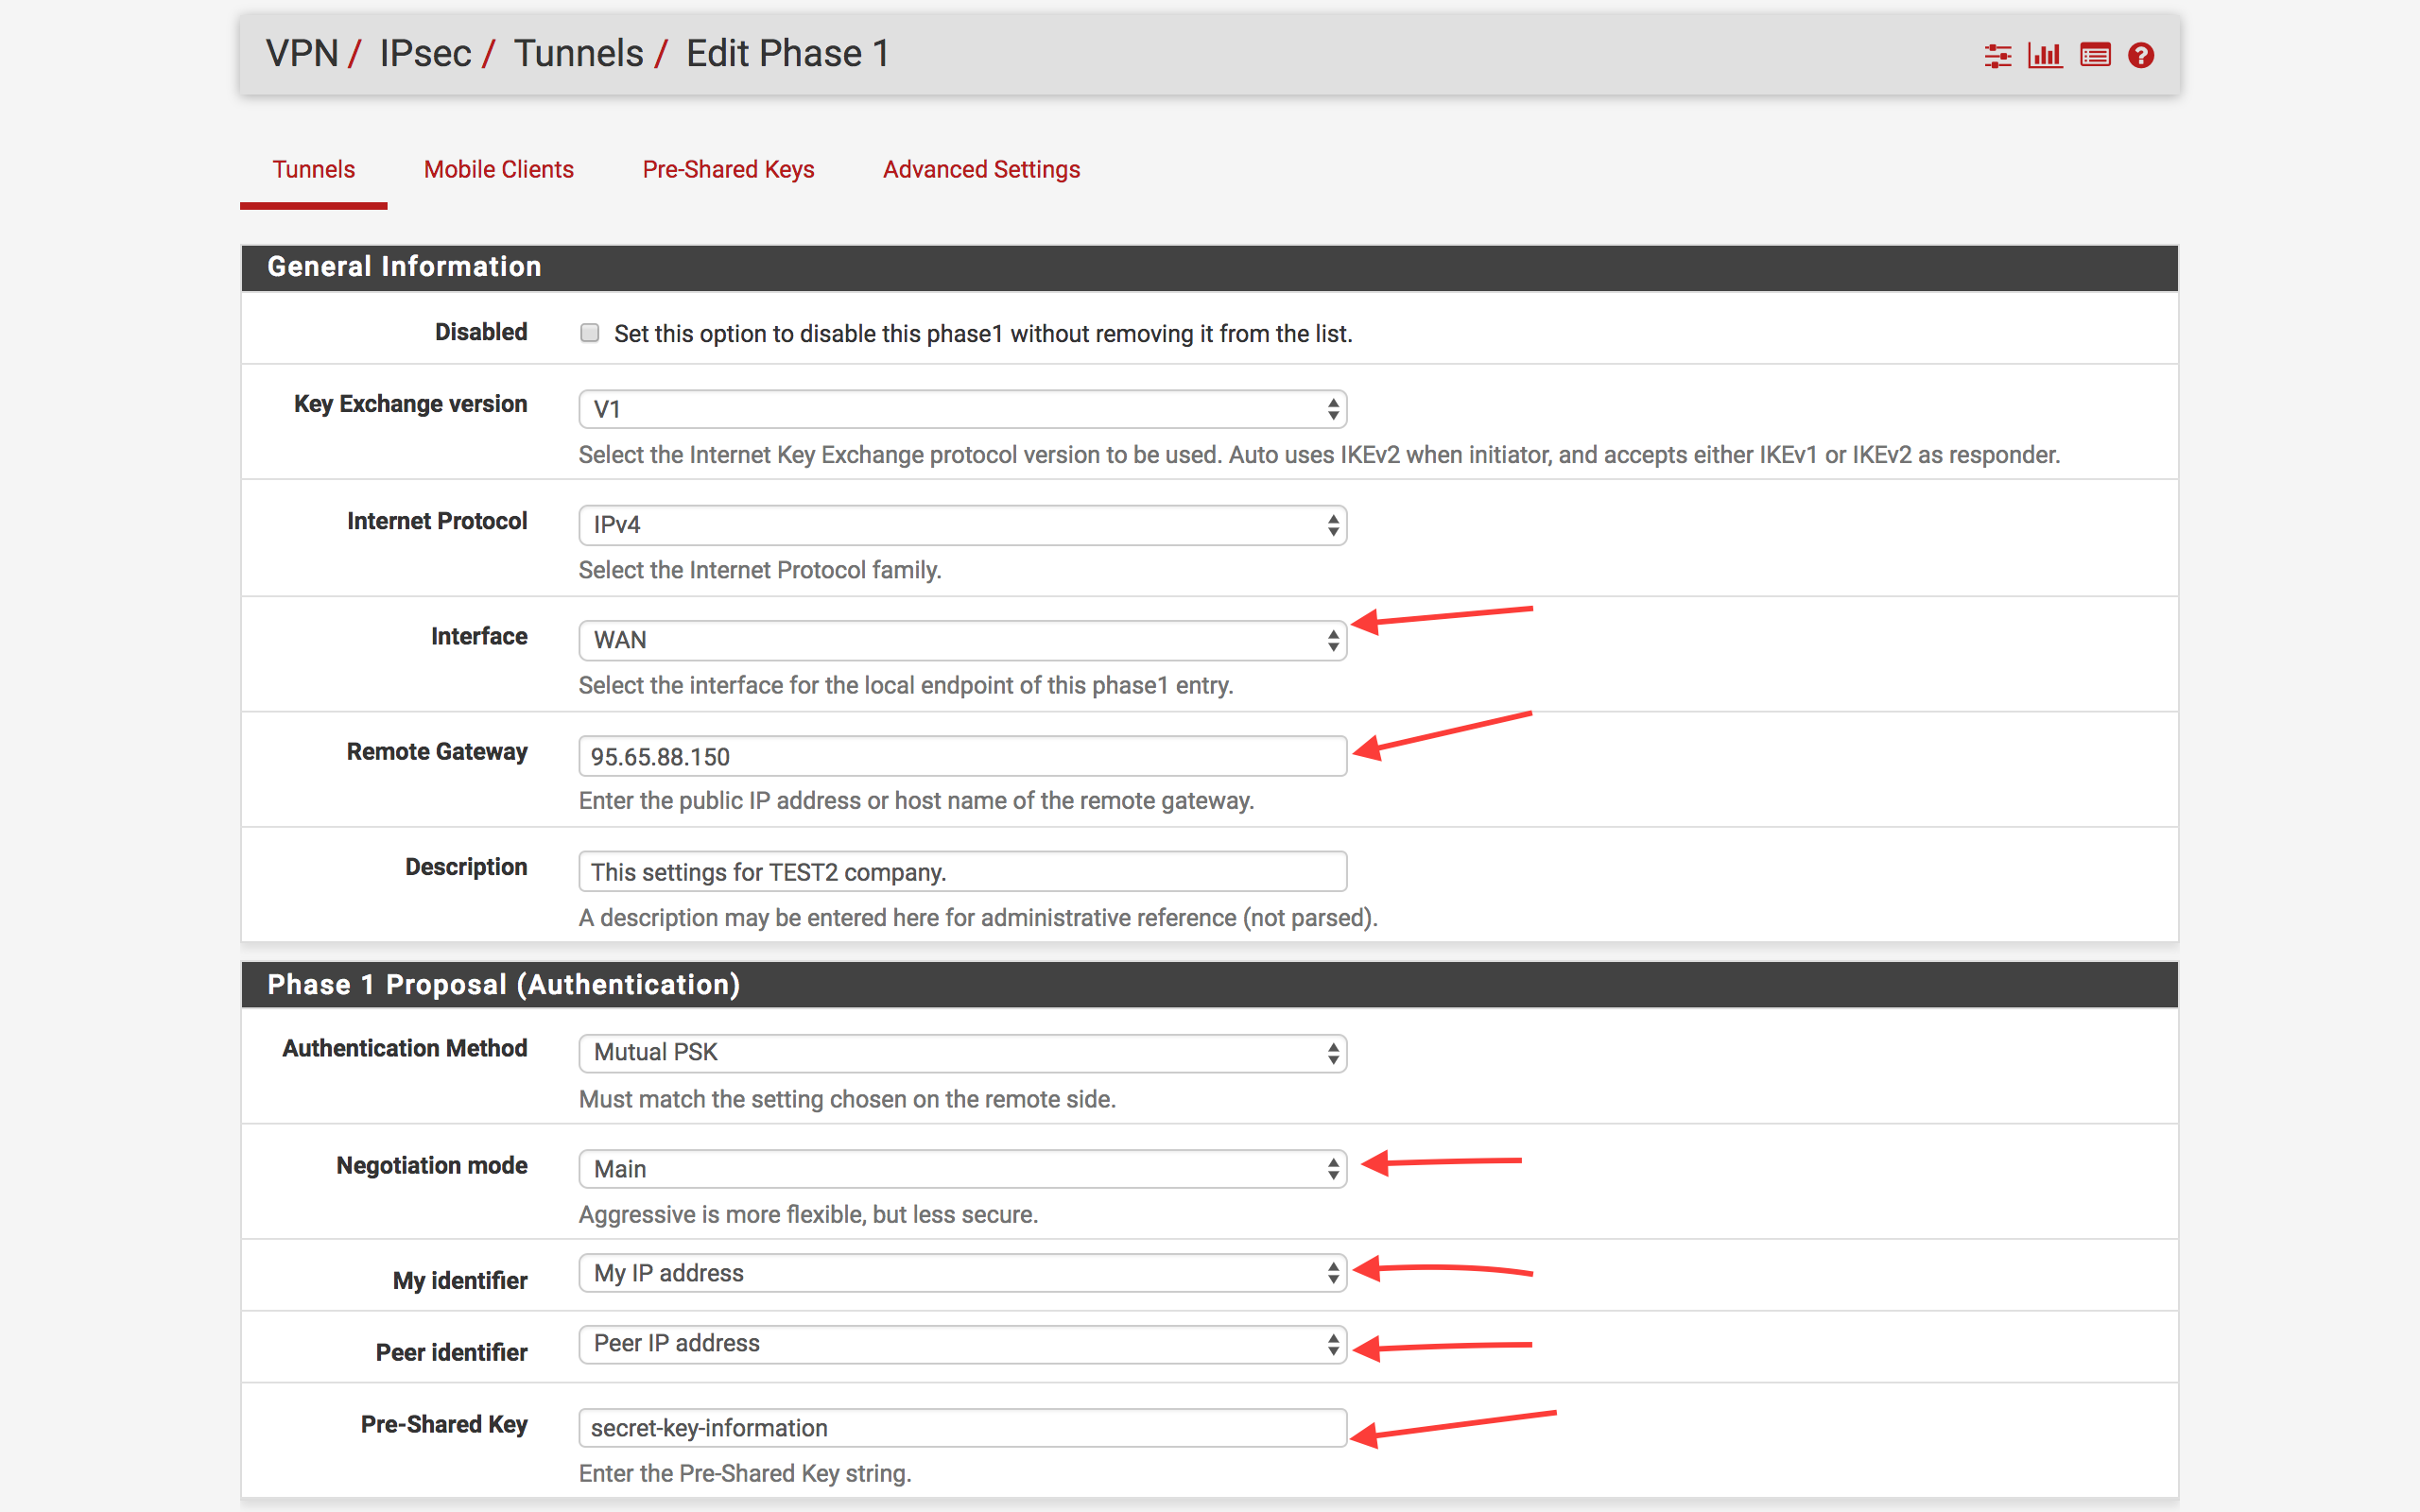
I told the important information you have to enter the blank lines. After you have made the important settings mentioned above, click “Save” button to save the settings.
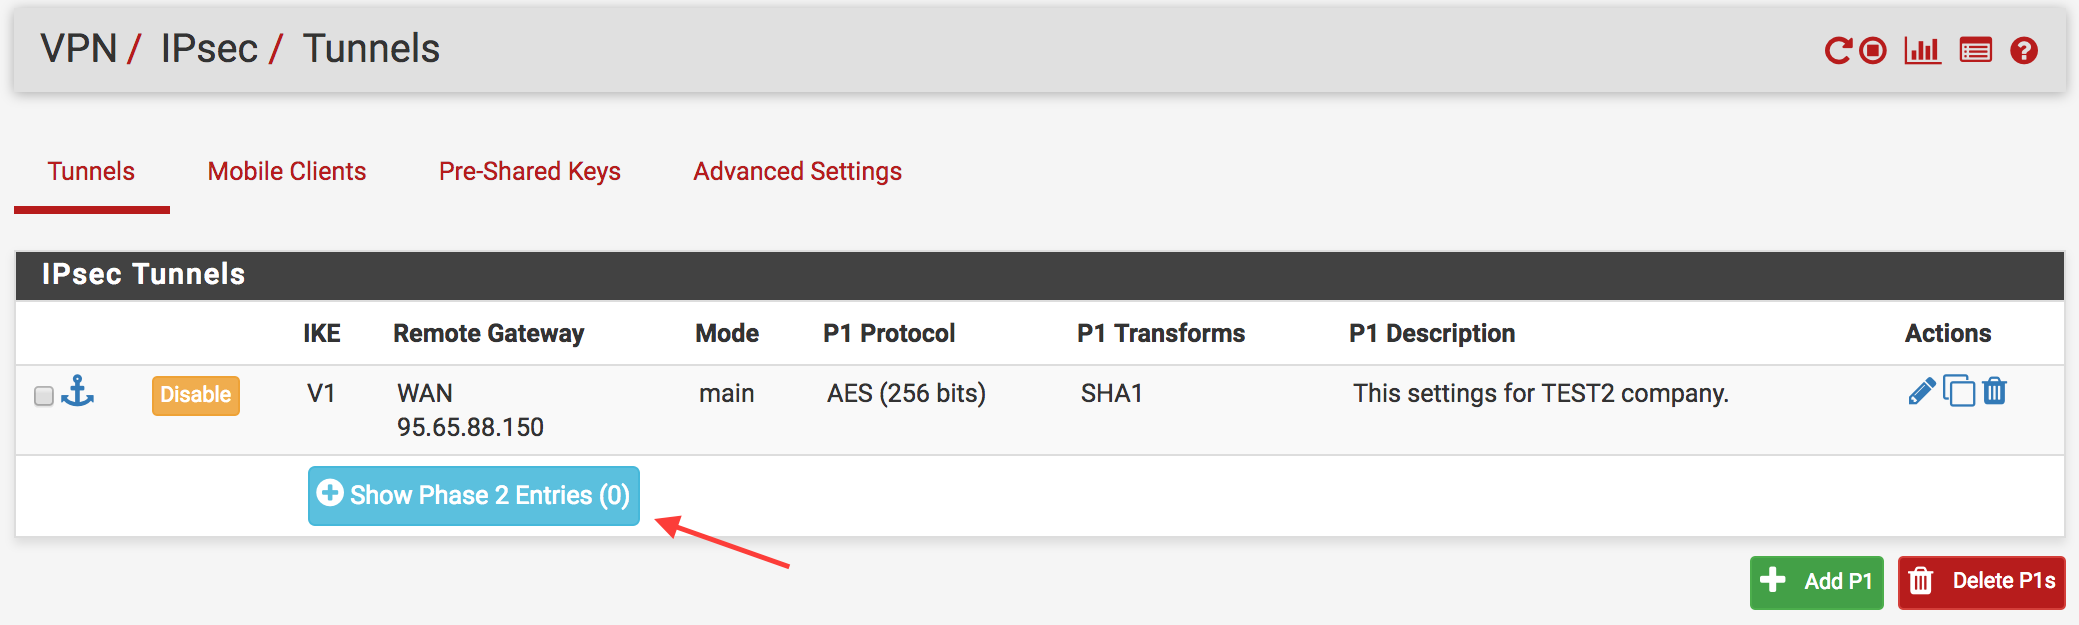
Remote gateway : Enter the public IP address of the remote gateway. Example: ( TEST2 95.65.88.150 internet ip address.)
Description : A description may be entered here for administrative reference (not parsed).
Negotiation mode : Choose the main option.
My identifier : Usually using the “My IP Address” option.
Peer identifier : Usually using the “Peer IP Address” option.
Pre-Shared Key : Enter the Pre-Shared Key string. Two company will use the same password.
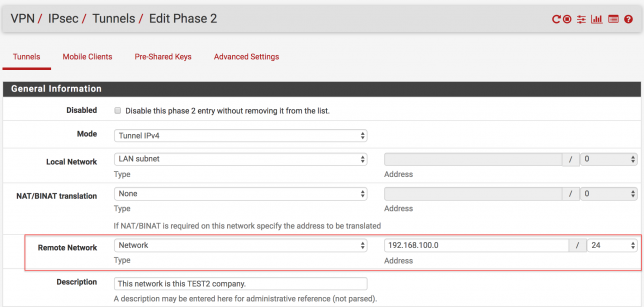
The next step is to set the network range to be accessed after connecting to the destination branch, which is the 2nd stage. Follow the steps step by step below.
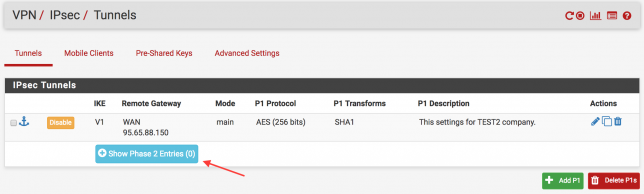

In the following figure, you are writing the network range and netmask value of the target branch. Click to “Save” button to save the settings.
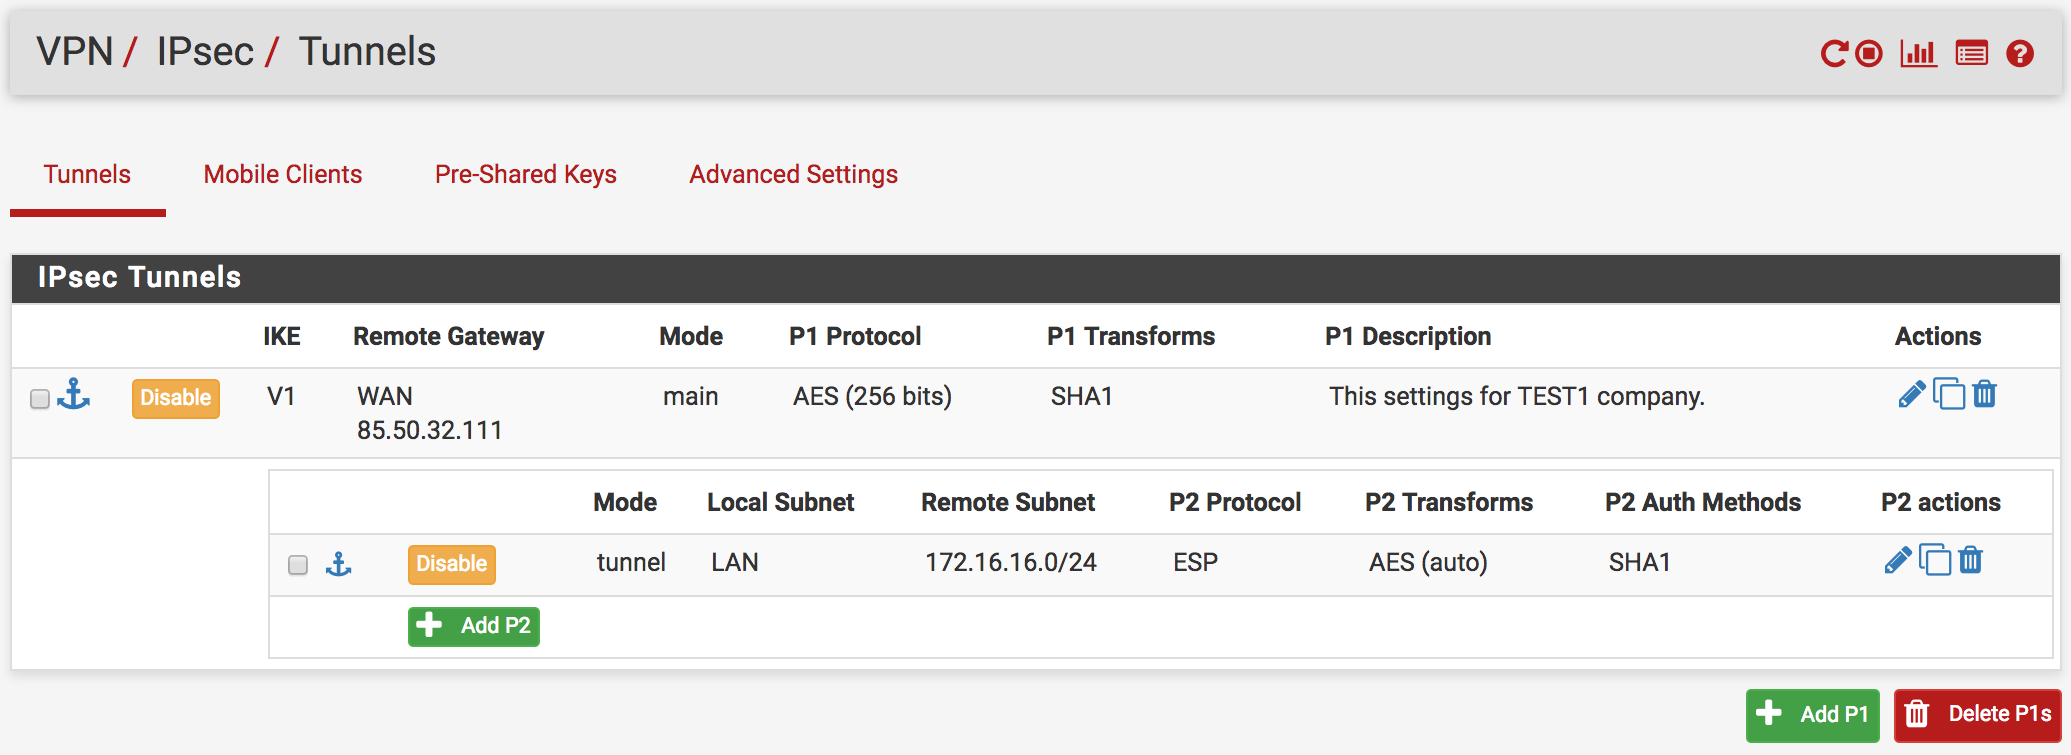
The final version of the rule is as follows. Do not forget to click the “Apply Changes” button after every settings.
IPsec Configuration TEST2
If you want to know what is your internet ip address, check it over with this web site.
- TEST1 company has one static internet ip address : 85.50.32.111
- TEST2 company has one static internet ip address : 95.65.88.150
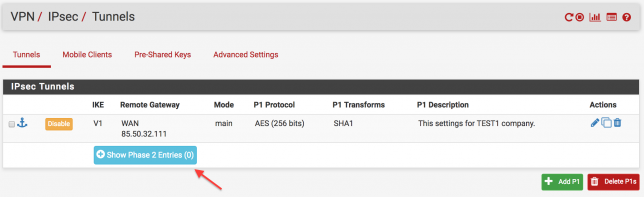
In the main menu enter the VPN > IPsec tab. After that follow the arrows.
Before the branch of the TEST1 IPsec VPN settings, we will do the same settings on the TEST2 pfSense ( expect IP Address ). Click to “Save” button to save the settings.
The next step is to set the network range to be accessed after connecting to the destination branch, which is the 2nd stage. Follow the steps step by step below.
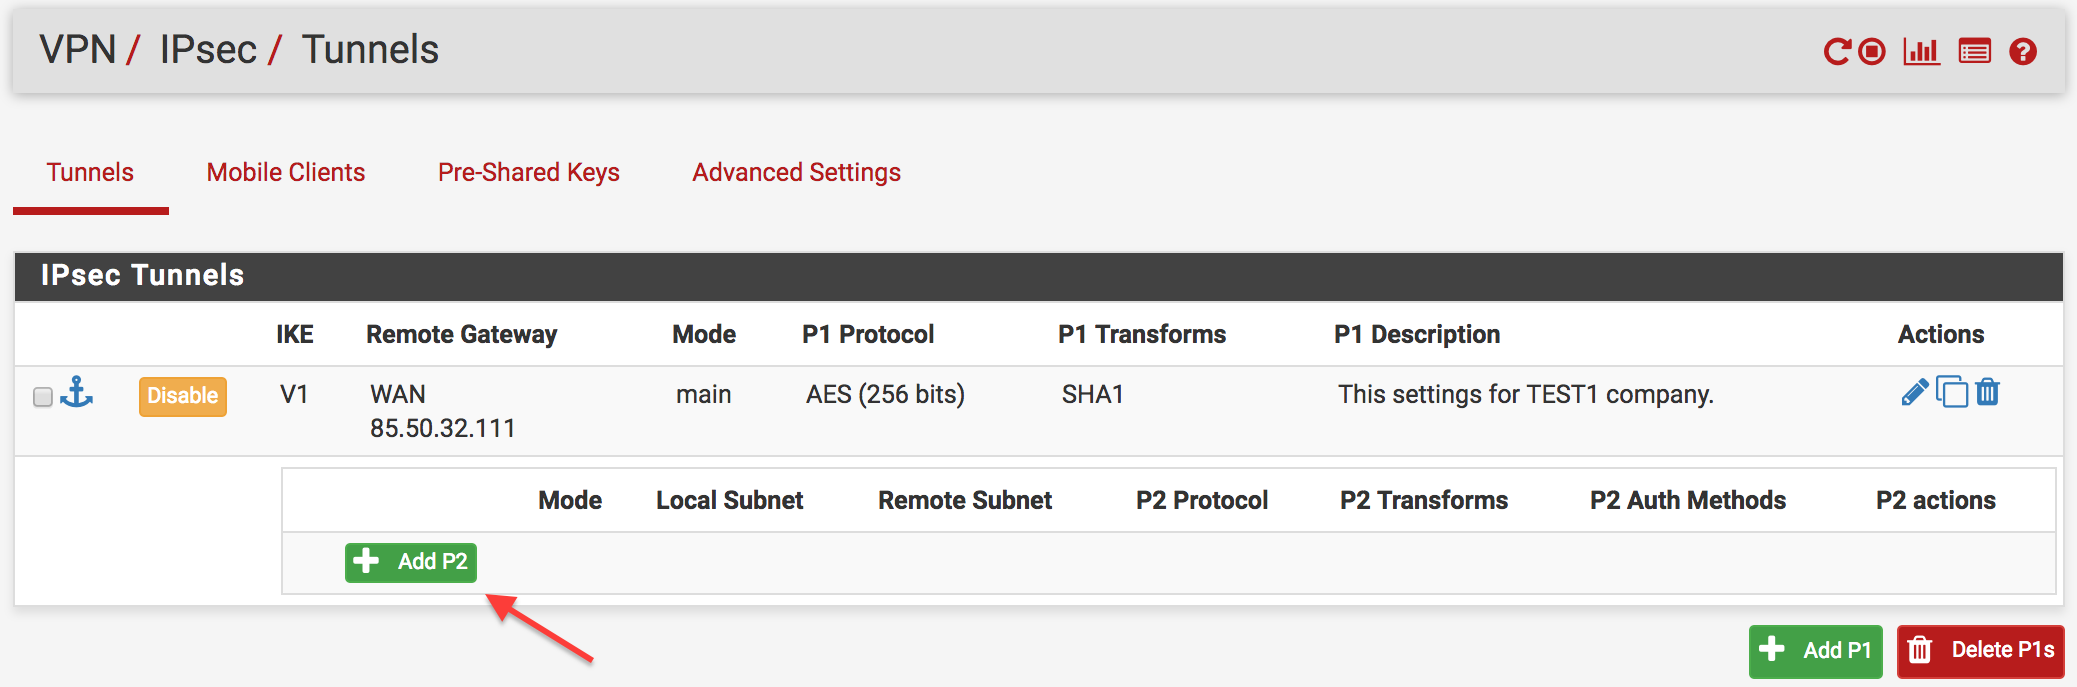
In the following figure, you are writing the network range and netmask value of the target branch. ( I mean network range of the TEST1 branch. ) Click to “Save” button to save the settings.

The final version of the rule is as follows. Do not forget to click the “Apply Changes” button after every settings.
Create Allow Firewall Rule!
If we want to our clients access to other site clients. We have to create allow firewall rule on the IPsec firewall menu. Let me show you.
Go to Firewall > Rules > IPsec and click to + button for create a new rule. And choose the protocol TCP/UDP and click to “Save” button. That’s it.

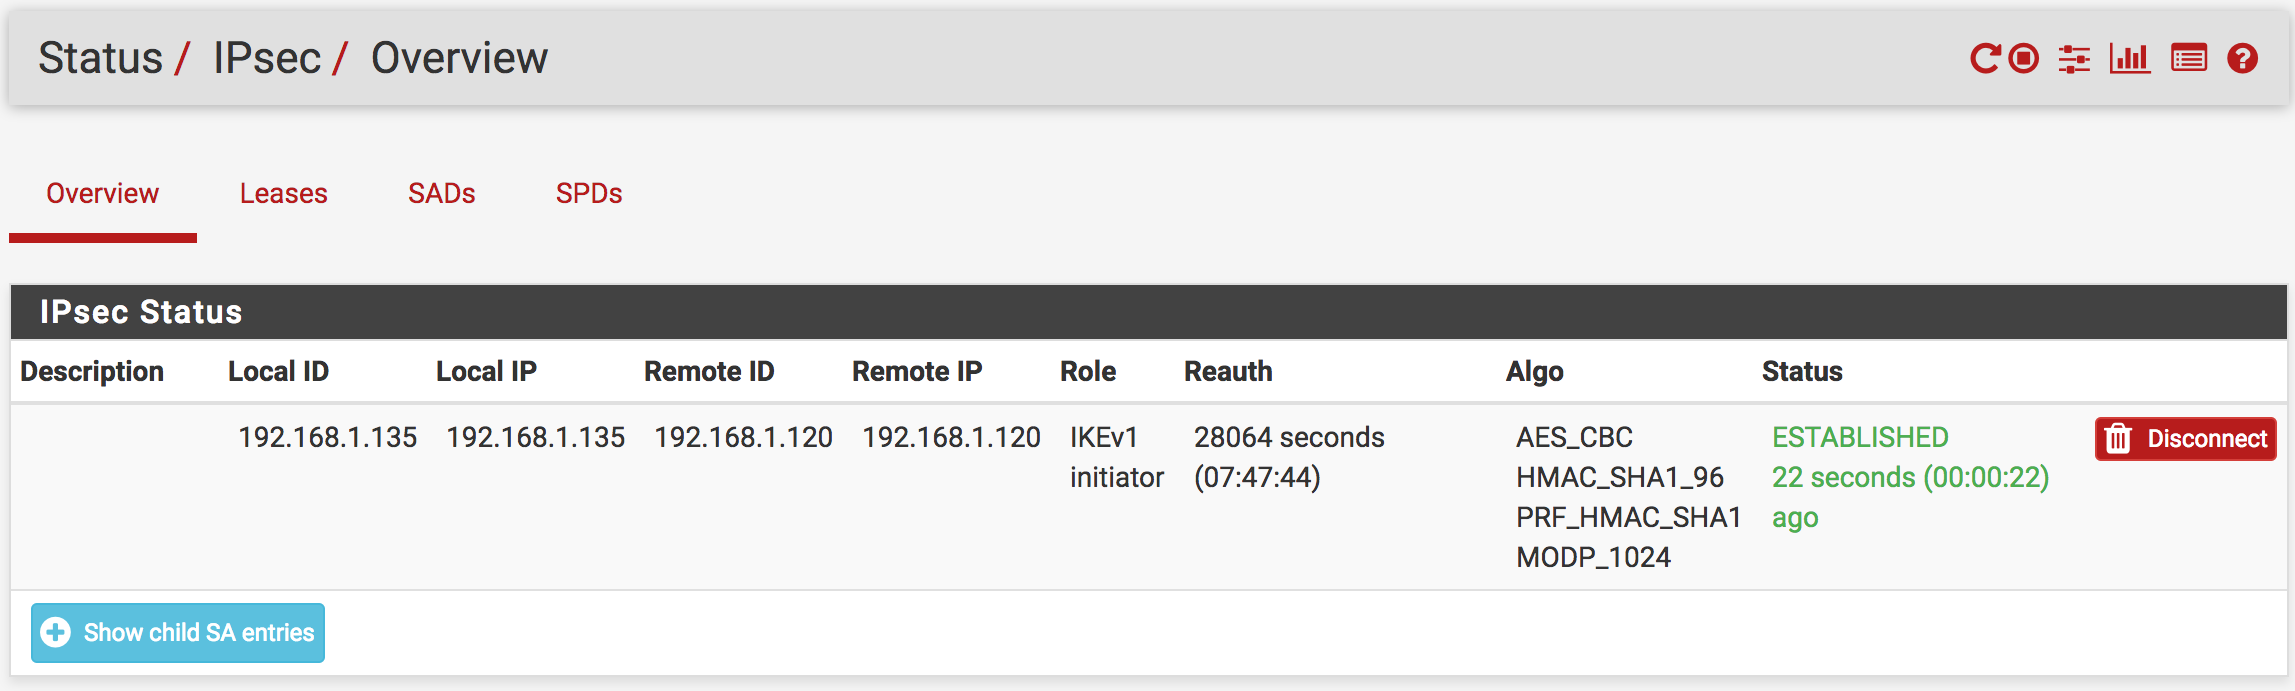
IPsec VPN Status
If you want see IPsec VPN status, follow the this way Status > IPSec. We configured the IPsec VPN and now these two companies can now connect to each other. For example TEST1 clients can access to TEST2 network.
Do not forget to click “Connect VPN” options.
Here is a example status of the IPsec VPN. Don’t think about the ip address, you will think “WTF is these ip address, these are local ip address, what’s going on? “. Guys this is an just example to help you to understand IPsec status. 🙂
IPsec Doesn’t Work!!
If IPsec VPN doesn’t work, follow the steps below and try if you like.
- Check the IPsec VPN settings are correct. ( ip address, network range, netmask etc.)
- Modem device can block the IPsec packets. Allow the IPsec ports number on the modem devices both of the company.
- If your modem has DMZ feature, you can use this feature to send all traffic comes from the modem devices to pfSense firewall.
- Do not forget to add allow rule on the IPsec firewall menu. ( Firewall > Rules > VPN )
- Check the firewall messages. Try to check both of pfSense firewall. ( Status > System Logs > IPsec )
- You can try to stop the service of IPsec VPN and start again.
- Access the pfsense firewall terminal and use the tcpdump command to look the ipsec packets are coming or not. This is so good way to find the problem. If packets doesn’t come to pfsense. You need to find problem on the modem device.)
- You can write comment or you can search the problem on the google.
” Online pfSense Firewall & Router Eğitimi | www.udemy.com/pfsense-training “
Hi
Thanks for the tutorial . Have to Public IPs connected , from the instructions.
cant ping across the network yet . Getting close !!
Also created a firewall rule on both sides for ICMP .
Hi,
Thanks for the comment. Please create a firewall rule which allow “any” everything on IPsec firewall menu. And then try to ping from a host to another a host in the other network.
Do not forget that the networks shouldn’t be the same as the other pfsense’s network. Check network subnets on IPsec phases 2.
Q : Can you ping the pfsense LAN interface ip address which is on the other side from your own network.
Also ensure that on the other side when you try to ping to, the client has correct ip,netmask,gateway for reply your echo packets.
Also could you please check the NAT rules, just see that IPsec nat rules created.
BTW, check two pfsense has the same version! Like A_pfsense 2.4.4 B_pfsense 2.4.4
I actually have not so much things to say, just check what I said and then if you still have the problem. We might search problems on the Google for further.